Relevant to:
Old Interface
This article is relevant to Old Interface users (registered before 12/31/2013).
Adding an Image to a Page
Adding an image to an internet page can convert a dull, lifeless website to an attractive, inviting one. The page editor allows images to be easily added to the body of the page or to any other position supported by the system editor (such as titles and menus and even templates for products available at the virtual store). Images are added in two stages – uploading the image to the website's file manager and displaying an image from the file manager on the website.
The system supports a "Photo Album" application that displays several images grouped together – the different options for this application are explained under "Gadget" tools and in the "Albums" application located under "Tools". This section describes how to add a single image to the editor, though the steps can be repeated to insert additional images.
Insert Image
Before an image can be inserted, it must first be loaded to the website's "file manager". Images can be loaded using the Manage Files option, which allows the user to select the file manager directory to which the image will be uploaded. A second option is to upload the image to the root directory directly from the Insert Image tool.
To insert an image, click on "Image" ( ). ).
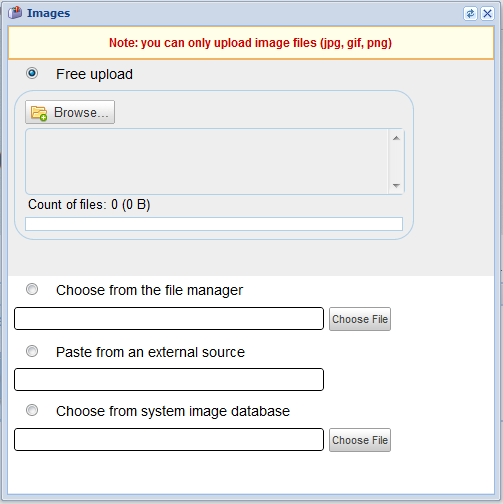
The window that appears offers several options.
Click on "Browse" in the "Free Upload" section of the window, to select a file directly from the computer and upload it to the file manager's root directory. After selecting a file, click on Upload to upload the image to the website file manager and insert it directly to the page.
Clicking on "Choose File" which appears next to "Choose from the File Manager" opens a window in which the website's file manager will appear. There, the user can navigate to the image that has previously been uploaded and insert it by clicking on it. When this method is used, the image path will appear in the textbox. Clicking "Add" will add the image to the page.
If the "Paste from an external source" option is selected, a link to an image that is not stored in the website's file manager can be pasted. Clicking "Add" will add the image to this page.
Regardless of the method chosen, the image will be placed at the cursor's position on the editing interface tool.
Editing an Image
An uploaded image can be edited by clicking on it with the right mouse button and selecting Image Settings from the menu that appears.
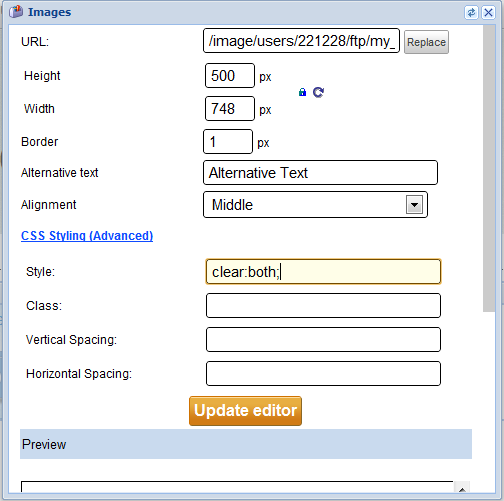
This window allows the user to define and modify different settings.
-
Height and Width fields control the dimensions of the image that will be displayed on the page – in standard pixel units. The image dimensions can be modified by changing these numbers.
-
Clicking on the lock icon releases the linked height/width proportions. Proportions are linked by default; therefore a change to one dimension will automatically modify the other, in order to maintain correct proportions between the two values. Clicking on the lock changes the default and allows the height and width values to be defined independently of each other.
-
Clicking on the arrow will restore the image's default dimensions.
-
The size of the image's border can be defined in the "Border" field.
-
Text related to the photo can be entered in the "Alternative Text" field. See below for an explanation of how this text is used.
-
The "Alignment" field will determine how to align the image on the page.
-
Advanced users can paste their own CSS code to the "CSS Styling" field to control the image display. Entering code such as border-color:red will set the color of the image's frame (if it had been defined) to red. This option is for users familiar with CSS. We do not provide technical support for these codes.
To complete the operation, click on "Update Editor" and the image will appear on the page.
Tips and Highlights
-
The image formats that the system supports appear in the Insert Image window. It is recommended to upload relatively smalls, high quality images so that they don't weigh down the page and cause it to load slowly.
-
The image dimensions can be modified from the Edit Image window, but please remember that images are loaded at their actual size and scale. For example, a 1600x1200, 2MB image, maintains its original size and scale even if it is displayed as 160x120. In addition, displaying reduced-sized images affects their quality and requires loading time overhead and significant computer resources on certain browsers. We therefore recommend retaining the original size of images inserted (to avoid the need to modify their sizes in the browser) and editing the images to reduce their size before uploading them. Keep in mind that a heavy page loads slowly and interferes with the users' web-surfing experience.
-
It is recommended to define alternative text for each image. This text is displayed to the user when the mouse is passed over the image (in certain browsers); in place of the image in case it isn't loaded for any reason; and is read aloud by designated browsers for users who are visually impaired. Search engines also use this text to understand the content of the image. Standards require that alternative text be defined for every image, but this is not required by our system.
-
To enlarge an image by clicking on it (without using the Album tools), upload a reduced version and an original version of the same image, insert the reduced version on the page itself and create a link (using the "Link" button) to the full-sized image which will open in a new window.
|
|
|
|
|

 English
 Español
 Deutsch
 Français
 Pусский
 العربية
 हिंदी
हिंदी Italiano
 日本の
日本の Português
 עברית
עברית