This tutorial will elaborate on the functionality of the web form element and explain how to add, style and position a form.
The “Forms” element can be found on the side Toolbar under the Popular category. To add a web form, grab the Forms element and drag it to the page.
Once you dragged the template form into the page, You can left click on it and click Replace.
-
You can select if you wish to Change form or Add new form.
-
When adding a new form you can select a basic form layout to get you started.
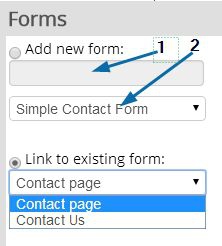
Once you named your form and selected a layout, click Apply. The desired layout is now visible on the page itself.
To manage any form by adding and removing fields to it, you first need to add it to a page.
Add a Forms element to the page, left click on it and select Replace. select your form and click Apply.
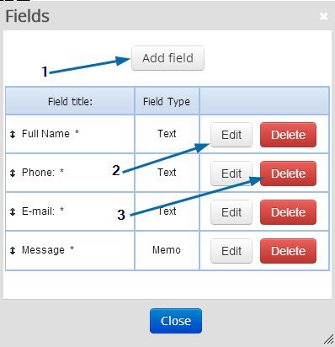
Left clicking on the form now enables the management of it’s fields through the contextual menu by clickin on Fields.
-
Add new field by clicking Add field.
-
Editing Existing fields.
-
Deleting Existing fields.
Important note
The message will be sent from E-mail address filled by the user. If the user did not fill E-mail address (could happen, when E-mail fields is not set as required field) or the form does not contain a field of E-mail type, the message will be sent from Do-Not-Reply@websitedomain.com.
You can resize any element by simply dragging the orange borders around it that appear when it’s selected.
You can access the contextual menu by left clicking on the form.
Design
You can easily change the appearance of the form itself, it’s fields and the Send button.
Fields - Edit, Add and Delete fields
Click Delete to delete a field.
Add field to add a new field to your form.
When clicking Add field, you must specify the field type.
Text - A one line field.
Memo - A larger text field.
Checkbox - The user can check or uncheck this checkbox.
Selection Box - A dropdown option selector.
Radio Buttons - A mutually exclusive selector.
E-mail - A text field that expects a valid Email address - Can be used as a mailing list.
Countries - A dropdown country selector.
Add File - Users can upload a file to the form up to 5mb, The file will be linked in the form notifications.
Select Date - A field that has a date selector next to it for dates.
Select Time - A field that has a time selector next to it for times.
Separation Line - A simple horizontal line.
Free Text - This is simple text that can be added, The user does not need to fill out any information and is used for comments or instructions.
Password - A field that displays asterisks instead of characters when being filled out.
Replace - Pick a different form
Allows you change the selected form.
Style - Border and shadow styling
Opens the style interface, Sets the border and shadow attributes
You can change the position of any element by simply clicking on it and dragging it around the page.

 English
 Español
 Deutsch
 Français
 Pусский
 العربية
 हिंदी
हिंदी Italiano
 日本の
日本の Português
 עברית
עברית